
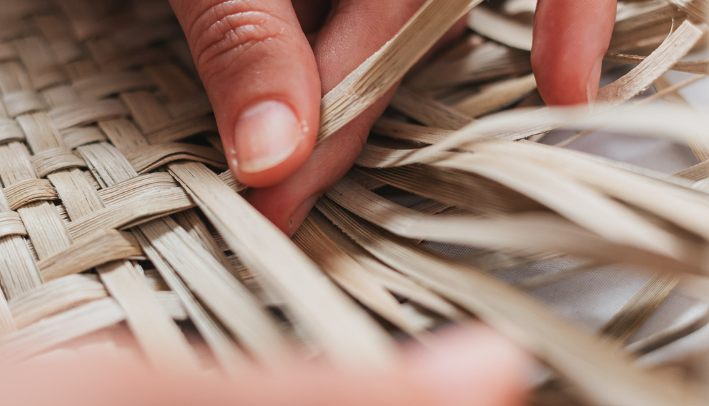
Basket weaving is an intricate art form that requires patience and skill. However, many beginners make some common mistakes that can hinder their progress and affect the overall quality of their baskets. Here are some semantic NLP variations of Common Mistakes in Basket Weaving:
- Errors in Preparation:
- Not soaking the reeds long enough
- Using the wrong size or type of reed
- Cutting reeds too short or unevenly
- Failing to properly secure the base of the basket
These mistakes can result in a basket that is weak, unstable, or even unusable, making it important to take care during the preparation stage. It’s worth mentioning that paying attention to details such as these small nuances gives rise to unique and authentic masterpieces. Therefore, becoming more comfortable with them paves way for excellent finished goods.
A few years ago, I met a passionate artisan at a local craft fair who shared her journey with me. She had once abandoned basket weaving because she felt it was too difficult. Despite this lapse of disappointment, she eventually learned from her mistakes and bounced back to weave exceptional pieces that were awe-inspiring.
Coiling may sound like something you do when you’re stuck in traffic, but it’s actually a crucial technique in basket weaving.
Technique #1: Coiling
To learn the coiling technique used in basket weaving, you need to have the right materials and follow the steps correctly. In this section, you will find solutions for these two crucial aspects to help you master the skill with ease. The materials needed for coiling and the steps for the coiling technique are addressed in the following sub-sections.
Materials Needed for Coiling
To prepare for the coiling technique, certain materials are required. These include a coil tool, clay or other malleable material, a work surface covered with protective materials such as cloth or plastic, water in a spray bottle, and carving tools for shaping the coiled material.
- A coil tool is necessary to create even and smooth coils of clay.
- Clay or other malleable material is essential for molding into desired shapes.
- A work surface that is covered with protective materials serves to prevent the clay from sticking to surfaces that it should not.
- Water in a spray bottle is used to keep the clay moist while working with it.
- Carving tools are essential for working with and shaping coiled objects.
It’s important to note that larger coils may require additional support during the building process. Therefore, small wooden sticks or other items can be added as filler material within larger coiled structures for extra support. A crucial factor in achieving optimal results through coiling technique involves being mindful of the amount of pressure applied when forming the coils. Applying excessive force can lead to objects losing their shape on account of this being a gentle and intricate process. For an efficient outcome when working on your creation using coiling techniques, It’s good practice to start with smaller pieces before scaling up from there. This helps you get more comfortable working with the equipment and develop skills required to produce sophisticated end results. Coiling like a snake has never been so easy with these foolproof steps.
Steps for Coiling Technique
The Coiling Technique involves wrapping a strand of material around itself to form a spiral pattern. To master this technique, follow these 4 easy steps:
- Choose a pliable material such as wire or string.
- Hold the end of the material and twist it around itself to form a tight loop.
- Continue twisting and coiling the material around the loop until it begins to form a spiral shape.
- Keep coiling until you reach your desired length, then secure the end of the material by tucking it under the loop.
For added texture and variation, experiment with different materials, sizes, and shapes. Incorporating beads or stones into your coils can also add an elegant touch. Remember, practice makes perfect!
Pro Tip: Use pliers to help control and shape your coil for more precise results.
Why settle for a braid when you can plait your way to hair perfection? Technique #2: Plaiting.
Technique #2: Plaiting
To master the plaiting technique in basket weaving as a solution mentioned in this section, you need two things – appropriate materials and knowledge of crucial steps. This sub-section discusses the materials needed for plaiting and outlines the essential steps to improve your plaiting technique.
Materials Needed for Plaiting
For the Plaiting Technique, a variety of essential materials are required. These include items that aid in the creation of a plait and ensure it remains in place.
- A section of hair to be plaited
- A fine-tooth comb or brush to detangle hair
- Hair elastics or bands to hold hair in place when necessary
- Bobby pins to keep stray hairs in place during plaiting
- Hairspray or other styling products for sleekness and hold
- A clearly defined area with ample lighting and comfortable setting
Additionally, it is often beneficial to work on freshly washed and dried hair that is free from any tangles. Furthermore, removing all knots allows for optimal control over each strand when creating a plait.
One useful suggestion while using the Plaiting Technique is using different styles of braids. Experimenting with methods such as French braids and fishtail braids can create unique looks while using the same primary technique. Opting for this approach adds versatility to one’s skillset as well as keeps interest alive when working with various future clients. Also, remember to always practice proper sanitation techniques both before and after completing a hairstyle on your customers!
Plaiting requires attention to detail and necessary items for success. With these materials in hand, one can execute beautiful plaits confidently while delivering excellent results. Get ready to braid and slay with these easy steps for plaiting perfection!
Steps for Plaiting Technique
Plaiting Hair – A Step-by-Step Guide
The art of plaiting hair has been a long-standing tradition that still remains popular today. This technique is perfect for anyone who wants to switch up their hairstyle without spending hours in front of the mirror. Here’s how to achieve the perfect plait:
- Start by parting your hair into three even sections.
- Take the right section and cross it over the middle section.
- Repeat with the left section, crossing it over the middle section.
- Continue braiding by alternating sides until you’ve reached the desired length.
If you want a more intricate plait, try implementing different variations such as fishtail or French.
Plaiting isn’t just reserved for long hair either! With shorter hair, add clips or hairbands at intervals to keep your plait in place.
So whether you’re looking for a casual beach-ready look or something more sophisticated for a night out, plaiting will always come through for you.
Did you know that ancient Egyptian women would often use beeswax to style and maintain their braids? (source: The Art of Ancient Egypt by Gay Robins)
Why bother twining when you can just tangle yourself up in a ball of yarn like a true cat?
Technique #3: Twining
To master the Twining technique with ease, you need to have the right materials and be thorough with the steps. In this section on technique #3, we’ll introduce you to the materials needed for twining and provide step-by-step instructions. Whether you’re new to weaving or simply new to this technique, we’ve got you covered.
Materials Needed for Twining
To start twining, you’ll need a few materials. These include a base material, such as cord or grass, and a wrapping material, which can be anything from wool to plant fibers. Additionally, you’ll need a pair of scissors for cutting the materials and a sturdy knot to secure your starting point.
- Base material: cord or grass
- Wrapping material: wool or plant fiber
- Scissors and knot for securing starting point
One important tip to keep in mind when choosing your materials is that they should be roughly the same thickness. Ensuring consistency from start to finish will result in a more polished final product.
For an added touch of creativity, consider adding beads or other embellishments to your twined creation. This can elevate the overall look and give it unique character.
Don’t miss out on discovering the beautiful results of twining. Gather your materials and get started today!
Let’s get twisted with these easy steps for perfecting the twining technique:
Steps for Twining Technique
Twining Technique for weaving directions involves overlapping two weft strands, alternatively passing them over and under weaving elements to produce a braided effect. To master the twining technique, follow these three simple steps:
- Select two weft threads and tie them together at one end.
- Take the first thread and weave it over the first element and under the second. Now, take the other thread and weave it under the first element and over the second.
- Repeat step 2, making sure to alternate which thread goes over or under each time until you reach your desired length.
A unique feature of this technique is that it creates a strong, sturdy fabric that can withstand wear and tear effortlessly. Practice these steps regularly to develop mastery in twining.
Did you know? The twining technique has been used by indigenous peoples in North America for centuries to create baskets and other woven items out of natural materials like grasses, bark, and animal fibers.
Mistakes in basket weaving are like a hole in the bottom – they’re not ideal, but they still hold some value.
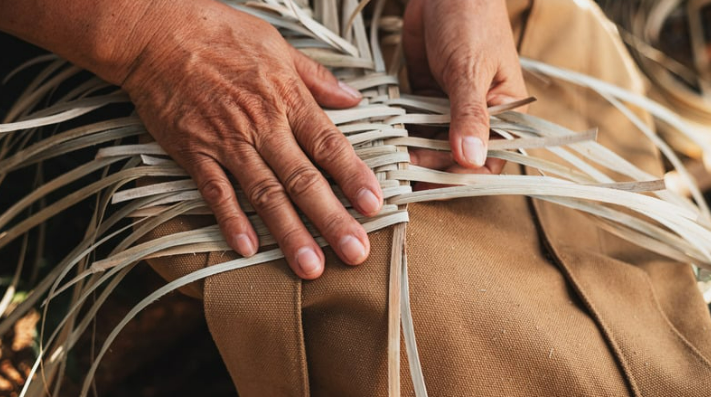
What are the Three Techniques used in Basket Weaving?
To avoid making potential mistakes in your basket weaving, turn to ‘Avoiding Mistakes in Basket Weaving’ with ‘Tips for Beginning Weavers’ and ‘Common Errors and How to Fix Them’ as your solution. Learn about the most common mistakes beginners make and how to overcome them to create the perfect basket.
Tips for Beginning Weavers
For novice basket weavers, there are some crucial guidelines to follow if you want to avoid mistakes and create great baskets. Here are some must-follow tips for new weavers:
- Choose the right materials: Picking the perfect raw material is essential in creating a well-made basket. Always pick sturdy materials that will complement the overall style of your basket.
- Make use of a pattern: Following a pattern is another important consideration to ensure that your basket is woven neatly and has uniform spacing. Start simple and gradually progress as you learn more skills.
- Master the basic techniques first: Learning fundamental weaving techniques before trying complex intertwining patterns is vital. A strong foundation will give your future work stability, durability, and beauty.